Friday, December 28, 2012

Learn Corel PaintShop Pro X4: Workspaces - The Manage workspace

The Manage workspace is the default workspace (if you want, you can set another workspace to be the default workspace: File -> Preferences -> General Program Preferences -> Default Launch Workspace; it consists of 4 components (see the image below):


1. The Navigation palette — helps you find and organize photos. You can use the Search box or click the Collection tab or Computer tab to display the folders on your computer or you can sort photos by collection, tags, or ratings.

2. The Preview area — the area where are displayed the images. In the top-right corner of the Manage workspace there are two buttons (see the image); use these two buttons to switch between the two views — the Preview mode (a large single-image view) or the Thumbnail mode (a multi-thumbnail view - see the image below):


3. Info palette — displays information about the selected image (the settings used to take the photo, an area where you can add information about the image, such as tags and ratings).

4. The Organizer palette — this palette lets you select photos (as thumbnails) and includes a toolbar with a range of commands and options for managing photos.

If you don't like the Manage workspace aspect you can customize it: you can resize the palettes, you can undock and move them (see the image below), you can hide the Navigation palette and the Info palette
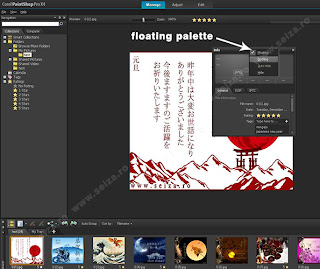
Click on the little arrow in the upper-right corner of the palette’s title bar. Check the Floating option. Drag the toolbar / palette to a new position. In order to dock a toolbar or palette, you can drag the toolbar or palette’s title bar to one edge of the workspace. The toolbar or palette snaps into place.
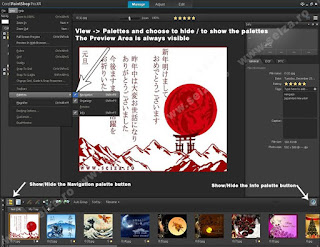


You can hide / show the toolbars and the palettes (except the Preview Area, which is always visible). The Show/Hide Navigation button (situated in the bottom-left corner) shows or hides the Navigation palette and the Show/Hide Info button (situated in the bottom-right corner) shows or hides the Info palette. You can hide / show the Palletes from menu -> View -> Palettes. Useful tip: Press "Ctrl + Shift + T" to display all toolbars and palettes.

Thursday, December 27, 2012

Learn Corel PaintShop Pro X4: Workspaces

Corel PaintShop Pro X4 consists of three workspaces: Manage, Adjust and Edit; each one of these workspaces consists of palettes, toolbars, and open images (there are not open copy of your images; if you delete the original image from your computer, the image will disappear from the workspace).

If you don't like the default aspect of the workspaces, you can create your own custom workspaces:

1. Saving a custom workspace. When you save a workspace, Corel PaintShop Pro X4 saves the following informations: ruler, grid, and guide informations, menu, palettes and toolbar settings, locations, docking status, full screen edit mode status, open images, including zoom levels and scroll bar locations. In order to save the current workspace, choose File -> Workspace -> Save (or you can use the following Short key: Shift + Alt + S), type a name in the New Workspace Name field, and click on Save. If your workspace contains any modified images that you have not saved, you are prompted to save the changes to your image. It would be better to use a relevant name for your workspace, especially if you are sharing the computer with other persons.

2. Loading a custom workspace. Once you've saved a workspace you can load it everytime you need it. Go to File -> Workspace -> Load or press Shift + Alt + L and the Load Workspace dialog box appears. Choose one of the following options: Yes if you want to save the current workspace before loading another one or No if you don't want to save the current workspace before loading another one. Next: select the workspace you want to load and click on the Load button.

3. If you no longer want to use a saved workspace, you can delete it - File -> Workspace -> Delete (or Shift + Alt + S), select the name of the workspace you want to delete and press the Delete button

Thursday, December 20, 2012

How to make your own tattoo design (4)

Read the first parts of this tutorial:
How to make your own tattoo design (1)
How to make your own tattoo design (2)
How to make your own tattoo design (3)

In order to personalize even more my tattoo I've added some text in the lower part of my tattoo design. Because the butterfly is both a symbol of the ephemerality and a symbol of the joy of living I've decided for a Japanese expression "今を楽しめ" - equivalent with the famous Latin maxim "Carpe Diem".

In order to match the text with the rest of the tattoo design I've changed a little the text's appearance: Control Panel -> Make Envelope -> Warp Options -> Style: Arc Lower (see the image below)


And the final result:

Wednesday, December 19, 2012

How to make your own tattoo design (3)

Read the first two parts of this tutorial:
How to make your own tattoo design (1)
How to make your own tattoo design (2)

Now we have the main part of our tattoo design and it's time to personalize it by adding several decorative elements. A tattoo design can be easily personalized by adding an element with a special meaning for the person who will get the tattoo. This element can be almost anything: a letter, a name, an ideogram, a zodiacal symbol, a flower, a scorpion or a spider, a butterfly, a star, a ribbon, etc.

For this tattoo design I've decided for a butterfly (because a lower-back tattoo is a feminine tattoo and the butterflies tattoo designs are one of the most popular choices when it's come to the feminine tattoos.)

So, let's get a nice butterfly for our tattoo. If you have your butterfly in an .ai or .cdr file, you can just open it in Illustrator and copy any element you want to use. If you have your butterfly saved as a raster image (like .png, .jpeg or .gif) you can place it on your artboard (File -> Place), preferably in a new layer. Once the raster image is placed on our artboard you have to convert it into a vector image (Image trace + Expand). Now you can get ride of the image's (white) background and you can scale the image without losing quality.


Edit the butterfly: choose a different Fill color, change the stroke, rotate the butterfly, resize it, rotate it again etc., until you are pleased with the result.


The last step: align the elements of your tattoo design. For that, select both elements (the group and the butterfly) and choose Horizontal Align Center from the Align panel (if you don't see the Align panel open it from Window -> Align or use the Shift + F7 key combination)

Monday, December 17, 2012

How to make your own tattoo design (2)

Read the first part of this post here.

Now we have a copy of the symbol we want to use for our tattoo design in the Symbol panel and an instance of the symbol on the artboard. Next, we have to convert the symbol's instance to regular artwork by breaking the link between the symbol and the symbol instance - in other words, we'll expand the instance (if you don't expand the instance, every time you'll edit the instance you'll modify the symbol and, simultaneously, all the symbol's instances). Click on the Break link to symbol button in the Symbol panel in order to expand the instance (see the image below):

Changing the fill color: If you want, you can change the fill color (see the image below) or the outline color of your artwork (in this case it is not necessarily need to change the colors, because black is the main colour for the tattoo inks).

Now, we have one half of our tattoo design, it's time to duplicate it in order to complete our design (being a lower-back tattoo, the design must be symmetrical). Follow these steps: with the artwork selected go to the main menu -> Object -> Transform -> Reflect -> Axis -> Vertically or select the Reflect Tool from the Toolbar (short key: o). Check the Preview option in order to see the changes in real-time and click on the Copy button when you are satisfied with the result. (see the image below)

Now we have on the artboard two overlapping objects: the initial artwork and the mirrored copy (being the last object created on the artboard, the later one is selected). We need to move horizontally one of the two objects (the copy) until we'll get a design appropriate for a tattoo. We can move the selected object (the copy) by hitting several time the right arrow key or by dragging the object (if you choose to drag the object in a new position you should keep the Shift key down in order to constrain the movement to the horizontal or vertical axis)

After the copy has reached the desired position (see the image below) it's indicated to group the two objects together and to lock the layer => select the two objects, click on Ctrl+G and the objects are now grouped. Is preferable to group the objects instead to unite them in a single new object because if you are not satisfied with the result and you want to change minors details of your artwork (like the orientation, the angle between the two objects, etc) it's very easy to ungroup the objects and and make the necessary adjustments.

Tuesday, December 11, 2012

How to make your own tattoo design (1)

In this tutorial I'll show you how to use Adobe Illustrator to draw a personalized and unique lower-back tattoo.

1. Open Adobe Illustrator and start a new document. If you consider to print your tattoo-design in order to show it to a tattoo artist it's better to select CMYK as the Color Mode for you document.

2. Open the Symbol panel. If you don't see the Symbol panel go to Window -> Symbols. Click on the Symbol Libraries Menu button (see the image below) or choose Window -> Libraries. Illustrator comes with a pretty large collection of symbols, grouped in categories. When you open a symbol library, it appears in a new panel, not the Symbols panel.You can explore the categories until you find a symbol which seems appropriate for your design.


Tip: if you find a library which contains symbols that you might want to use repeatedly in your future projects, you can validate the Persistent check box and the library will be automatically opened when you start Illustrator.


If you're not satisfied with the symbols from the Symbol Libraries you can make you own symbol - you can create symbols from most Illustrator objects (paths, compound paths, text objects, raster images, mesh objects, and groups of objects).

Anyway, in the Florid Vector Pack I've found a symbol which I can use for my tattoo design. Open the Florid Vector Pack, click on the 19th symbol to select it and drag it on the artboard (see the image below). The symbol is automatically added in the Symbol Panel and now we can edit it (you can not delete or edit the symbols from the Symbol Libraries).

Thursday, December 6, 2012

CorelDraw basics: use the Pick tool to skew objects

Skewing objects in CorelDraw

Draw an object (let's say a rectangle) and keep it selected.

Select the Pick Tool. If you have deselected the object you have to click on it to select it again. Now click again on the object and observe the difference. The selection points are turned into direction arrows. The Skew arrows are in the middle of the four lines of the rectangle.

Place the cursor near one of the direction arrows. The cursor's shape changes into a double straight line arrows.


Now, place the cursor on the mid-point of one of the horizontal lines of the object and drag to the left or to the right. The object will be skewed horizontally. Hold down the Ctrl key if you want to skew the object in 15-degree increments.


Place the cursor on the mid-point of one of the vertical lines of the object and drag up or down. The object will be skewed vertically. Hold down the Ctrl key if you want to skew the object in 15-degree increments.


Skew the object bot vertically and horizontally until you get a satisfying result:


If you want to observe more clearly the skewing effect you can apply another effect (like Drop Shadow) to the skewed object.

Saturday, December 1, 2012

Corel Draw basics: how to use the Pick Tool to stretch / scale objects

How to use the Pick Tool to stretch or to scale objects:

Draw an object (let's say a rectangle) and keep it selected

Select the Pick Tool. If you have deselected the object you have to click on it to select it again. Eight point will appear around the rectangle, one point near each corner and near the middle of the each side.


Scaling the selected object:

Place the cursor on any corner point. The cursor's shape changes into a double headed arrow showing the direction at which the rectangle will be resized.

By dragging the cursor outward the rectangle you will increase proportionally both the length and the width of the rectangle. If you want to scale the object (the rectangle) from the center, hold down the Shift key while dragging the cursor.


If you want to decrease the size of the rectangle you have to drag the cursor toward the center of the rectangle. By holding down the Shift key while dragging the cursor you will decrease proportionally both the length and the width of the rectangle.

You can scale multiple objects at once. Select the objects you want to scale and drag the cursor inward if you want to decrease the size of the selected objects or outward if you want to increase the size of these objects.


Stretching the selected object:

Select the object you want to modify and drag one of the middle points on the horizontal lines if you want to stretch the object horizontally or drag one of the middle points on the vertical lines if you want to stretch the object vertically.

By holding down the Shift key while dragging the cursor you can stretch the object from the center.


Wednesday, April 4, 2012

Corel Draw basisc: how to rotate an object -> the Transformation docker (2)

In the previous tutorial I've spoken about the Rotation docker; in this tutorial I'll spoke about the last section of the Rotation docker - the Copies box.

In the image bellow I have a document of 400x400 pixels and a rectangle positioned at 200,300 (don't forget that, in CorelDRAW, the point of origin (0,0) is at the lower-left corner of the drawing page). If I want to rotate my rectangle around the center of the document I'll set these values in the Rotation docker:
Center: H = 200, V = 200
Angle: let's say 45 degrees (don't forget: type a positive value if you want to rotate the object counter clockwise and a negative value to rotate the object clockwise).
The Relative Center check box must be disabled.

Now, if you want to keep the first rectangle in the original position, you can use the Copies box to place a copy of the object in the new position. In order to do so, type 1  in the copies box and click Aplly. A copy of the rectangle will be placed in the new position:


If you want to get more copies of the object (rectangle) just type the number in the Copies box. Keep in mind that the transformation / rotation will be applied to the copies: in the image below, the first copy of the rectangle is rotated with 45 deg relative to the initial rectangle; the second copy is rotated with 45 deg. relative to the first copy of the object (and with 90 deg relative to the initial object).

Thursday, March 29, 2012

Corel Draw basisc: how to rotate an object -> the Transformation docker (1)

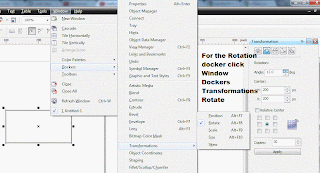
If you want to get more control when you are rotating an objects in CorelDRAW, you can use the Transormation docker. To access the Rotation docker click Window -> Dockers -> Transformations -> Rotate (shortcut: Alt + F8).


Rotation angle: type a value in this box and click Enter or ckick on the Apply button. Type a positive value if you want to rotate the object counter clockwise and a negative value to rotate the object clockwise.


If you need to rotate an object around a specific point (don't forget that the point of origin (0,0) is at the lower-left corner of the drawing page), you can set the coordinations of the Rotating Center: type values in the H and V boxes to specify the position of the object along the horizontal and vertical axes, and and click Apply (or Enter). The Relative center check box must be disabled.


If you want to rotate an object around a point relative to its current position, enable the Relative Center check box.


You can set the relative center of an object to its original position by enabling the Relative Center 
check box and clicking the center option in the area below the check box.


Sunday, March 25, 2012

Corel Draw basisc: how to rotate an object

Open Corel DRAW and draw something (a rectangle).
In CorelDRAW you have to select an object before applying a rotation, so keep the rectangle you've just drawn selected. If you deselected it by mistake, select it again using the Pick Tool.


Click again on the rectangle: the basic selection points are turned into some double-headed arrows:


 Place the cursor on any corner point. The cursor is changed from pointer into circular arrow that represents rotation movement. Press on any corner point and rotate: the rectangle rotates around its center.


Tip: Hold down the Ctrl key to constrain the rotation to 15 degree increments. 
If you need it, you can change the default value of the constrain angle: Click Tools ->  Options; in the Workspace list of categories, select Edit and type a value in the Constrain angle box.


You can also use the Angle of rotation box in the Property Bar to rotate an object. Just type a value in this box and click the Enter key (type a positive value if you want to rotate the object counter clockwise and a negative value to rotate the object clockwise).


The objects are rotating around the Rotation Point (or Rotation Center). Click on the Rotation Center and drag it anywhere in page. Press on any corner point of the object (rectangle, in this case) and rotate it. The rectangle rotates around its newly positioned center.


Saturday, March 17, 2012

Corel Draw basisc: how to move an object

How to move an object in CorelDraw: useful tips for the beginners.
You can position objects by dragging them to a new location, by nudging, or by specifying their horizontal and vertical position.

Positioning an object by drag-and-drop
1. Open Corel Draw, select the Rectangle Tool from the Toolbox and draw a rectangle.
2. Select the Pick Tool and click on the rectangle to select it
3. If you keep the cursor over a selected object, the cursor's shape will change into a cross (marked with a green circle in the image bellow). Now you can move the object

Keep the Left-button of the mouse pressed and drag the square anywhere in your page and release the mouse button.
Press Ctrl + z to bring your rectangle in the initial position.

How to get more control when you move objects in Corel Draw:
If you want to constrain the movement to the horizontal or the vertical axis, hold down yhe CTRL key while dragging the object


Moving an object by nudging it:
If you want even more control over your object's movement, use the Arrow keys to nudge your object. Nudging lets you move an object in increments by pressing the Arrow keys. The increment value is known as nudge distance. Micro-nudging lets you move an object by a fraction of the nudge distance. Super-nudging lets you move an object by a multiple of the nudge distance. By default, you can nudge objects in 0.1-inch increments, but you can change this increment value to suit your needs. You can also change micro-nudge and super-nudge values.

To nudge a selected object by the nudge distance, press an Arrow key.
To nudge a selected object by a fraction of the nudge distance (micro-nudge), hold down Ctrl, and press an Arrow key.
To nudge a selected object by a multiple of the nudge distance (super-nudge), hold down Shift, and press an Arrow key


You can adjust the Nudge values using the Nudge Offset dialog box:

If you want to modify the default values of the Nudge / Super Nudge / Micro Nudge, go to Tools - Options - Document - Rulers:


To position an object by x and y coordinates:
Select an object. On the property bar, type values in the following boxes:
x — lets you position the object on the x-axis
y — lets you position the object on the y-axis
Press Enter.


Saturday, March 10, 2012

Corel Draw basisc: the Pick Tool

Pick Tool is the most important tool in CorelDraw. Everytime you want to select an object you'll use this instrument.
Position: in top of the Toolbox (this is the most important toolbar in CorelDraw - if you don't see it, go to Window -> Toolbars and check "Toolbox")
Shortcut key for the Pick Tool: Spacebar (if you are typing a text, the shortcut for the Pick Tool is Ctrl + Spacebar).

Object selection:
In CorelDraw, you must select an object before you can apply any change. You can select one object, a group of objects, or all the objects in the page.

Select a single object
Click anywhere on a filled object to select. If an object has no fill, click on the outline to select. A series of handles appears around your object to signify it is selected. Click anywhere outside the object to deselect it. If you click twice on an object, the rotation tool will be activated.


Select objects with No Fill
An object with no fill must be selected by clicking on the outline. To change this so that you can click anywhere within the object, choose Layout, Page Layout, Workspace, Toolbox, Pick Tool. Choose Treat All Objects as Filled from the Pick Tool Options.


Selecting more than one object
Choose Pick Tool. Click and Drag over multiple objects. All objects that fall completely within the marquee area will be selected. Release your mouse button and handles will appear around the perimeter of all objects selected. Check the status bar to confirm the number of selected objects.


Multiple Select using the SHIFT Key
Choose the Pick Tool. Click on one object to select. Hold down your SHIFT key and click on second object.Repeat as needed. This is a good way to select multiple objects no matter where they are on the page.

CTRL + A: use this shortcut when you want to select all the objects