Thursday, March 29, 2012

Corel Draw basisc: how to rotate an object -> the Transformation docker (1)

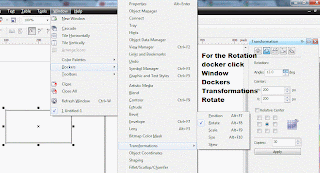
If you want to get more control when you are rotating an objects in CorelDRAW, you can use the Transormation docker. To access the Rotation docker click Window -> Dockers -> Transformations -> Rotate (shortcut: Alt + F8).


Rotation angle: type a value in this box and click Enter or ckick on the Apply button. Type a positive value if you want to rotate the object counter clockwise and a negative value to rotate the object clockwise.


If you need to rotate an object around a specific point (don't forget that the point of origin (0,0) is at the lower-left corner of the drawing page), you can set the coordinations of the Rotating Center: type values in the H and V boxes to specify the position of the object along the horizontal and vertical axes, and and click Apply (or Enter). The Relative center check box must be disabled.


If you want to rotate an object around a point relative to its current position, enable the Relative Center check box.


You can set the relative center of an object to its original position by enabling the Relative Center 
check box and clicking the center option in the area below the check box.


Sunday, March 25, 2012

Corel Draw basisc: how to rotate an object

Open Corel DRAW and draw something (a rectangle).
In CorelDRAW you have to select an object before applying a rotation, so keep the rectangle you've just drawn selected. If you deselected it by mistake, select it again using the Pick Tool.


Click again on the rectangle: the basic selection points are turned into some double-headed arrows:


 Place the cursor on any corner point. The cursor is changed from pointer into circular arrow that represents rotation movement. Press on any corner point and rotate: the rectangle rotates around its center.


Tip: Hold down the Ctrl key to constrain the rotation to 15 degree increments. 
If you need it, you can change the default value of the constrain angle: Click Tools ->  Options; in the Workspace list of categories, select Edit and type a value in the Constrain angle box.


You can also use the Angle of rotation box in the Property Bar to rotate an object. Just type a value in this box and click the Enter key (type a positive value if you want to rotate the object counter clockwise and a negative value to rotate the object clockwise).


The objects are rotating around the Rotation Point (or Rotation Center). Click on the Rotation Center and drag it anywhere in page. Press on any corner point of the object (rectangle, in this case) and rotate it. The rectangle rotates around its newly positioned center.


Saturday, March 17, 2012

Corel Draw basisc: how to move an object

How to move an object in CorelDraw: useful tips for the beginners.
You can position objects by dragging them to a new location, by nudging, or by specifying their horizontal and vertical position.

Positioning an object by drag-and-drop
1. Open Corel Draw, select the Rectangle Tool from the Toolbox and draw a rectangle.
2. Select the Pick Tool and click on the rectangle to select it
3. If you keep the cursor over a selected object, the cursor's shape will change into a cross (marked with a green circle in the image bellow). Now you can move the object

Keep the Left-button of the mouse pressed and drag the square anywhere in your page and release the mouse button.
Press Ctrl + z to bring your rectangle in the initial position.

How to get more control when you move objects in Corel Draw:
If you want to constrain the movement to the horizontal or the vertical axis, hold down yhe CTRL key while dragging the object


Moving an object by nudging it:
If you want even more control over your object's movement, use the Arrow keys to nudge your object. Nudging lets you move an object in increments by pressing the Arrow keys. The increment value is known as nudge distance. Micro-nudging lets you move an object by a fraction of the nudge distance. Super-nudging lets you move an object by a multiple of the nudge distance. By default, you can nudge objects in 0.1-inch increments, but you can change this increment value to suit your needs. You can also change micro-nudge and super-nudge values.

To nudge a selected object by the nudge distance, press an Arrow key.
To nudge a selected object by a fraction of the nudge distance (micro-nudge), hold down Ctrl, and press an Arrow key.
To nudge a selected object by a multiple of the nudge distance (super-nudge), hold down Shift, and press an Arrow key


You can adjust the Nudge values using the Nudge Offset dialog box:

If you want to modify the default values of the Nudge / Super Nudge / Micro Nudge, go to Tools - Options - Document - Rulers:


To position an object by x and y coordinates:
Select an object. On the property bar, type values in the following boxes:
x — lets you position the object on the x-axis
y — lets you position the object on the y-axis
Press Enter.

Saturday, March 10, 2012

Corel Draw basisc: the Pick Tool

Pick Tool is the most important tool in CorelDraw. Everytime you want to select an object you'll use this instrument.
Position: in top of the Toolbox (this is the most important toolbar in CorelDraw - if you don't see it, go to Window -> Toolbars and check "Toolbox")
Shortcut key for the Pick Tool: Spacebar (if you are typing a text, the shortcut for the Pick Tool is Ctrl + Spacebar).

Object selection:
In CorelDraw, you must select an object before you can apply any change. You can select one object, a group of objects, or all the objects in the page.

Select a single object
Click anywhere on a filled object to select. If an object has no fill, click on the outline to select. A series of handles appears around your object to signify it is selected. Click anywhere outside the object to deselect it. If you click twice on an object, the rotation tool will be activated.


Select objects with No Fill
An object with no fill must be selected by clicking on the outline. To change this so that you can click anywhere within the object, choose Layout, Page Layout, Workspace, Toolbox, Pick Tool. Choose Treat All Objects as Filled from the Pick Tool Options.


Selecting more than one object
Choose Pick Tool. Click and Drag over multiple objects. All objects that fall completely within the marquee area will be selected. Release your mouse button and handles will appear around the perimeter of all objects selected. Check the status bar to confirm the number of selected objects.


Multiple Select using the SHIFT Key
Choose the Pick Tool. Click on one object to select. Hold down your SHIFT key and click on second object.Repeat as needed. This is a good way to select multiple objects no matter where they are on the page.

CTRL + A: use this shortcut when you want to select all the objects