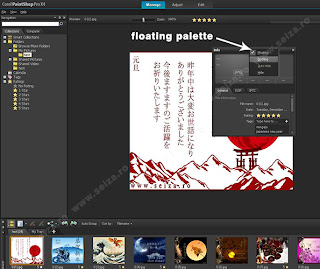
The Manage workspace is the default workspace (if you want, you can set another workspace to be the default workspace: File -> Preferences -> General Program Preferences -> Default Launch Workspace; it consists of 4 components (see the image below):
1. The Navigation palette — helps you find and organize photos. You can use the Search box or click the Collection tab or Computer tab to display the folders on your computer or you can sort photos by collection, tags, or ratings.
2. The Preview area — the area where are displayed the images. In the top-right corner of the Manage workspace there are two buttons (see the image); use these two buttons to switch between the two views — the Preview mode (a large single-image view) or the Thumbnail mode (a multi-thumbnail view - see the image below):
3. Info palette — displays information about the selected image (the settings used to take the photo, an area where you can add information about the image, such as tags and ratings).
4. The Organizer palette — this palette lets you select photos (as thumbnails) and includes a toolbar with a range of commands and options for managing photos.
If you don't like the Manage workspace aspect you can customize it: you can resize the palettes, you can undock and move them (see the image below), you can hide the Navigation palette and the Info palette

Click on the little arrow in the upper-right corner of the palette’s title bar. Check the Floating option. Drag the toolbar / palette to a new position. In order to dock a toolbar or palette, you can drag the toolbar or palette’s title bar to one edge of the workspace. The toolbar or palette snaps into place.

You can hide / show the toolbars and the palettes (except the Preview Area, which is always visible). The Show/Hide Navigation button (situated in the bottom-left corner) shows or hides the Navigation palette and the Show/Hide Info button (situated in the bottom-right corner) shows or hides the Info palette. You can hide / show the Palletes from menu -> View -> Palettes. Useful tip: Press "Ctrl + Shift + T" to display all toolbars and palettes.
1. The Navigation palette — helps you find and organize photos. You can use the Search box or click the Collection tab or Computer tab to display the folders on your computer or you can sort photos by collection, tags, or ratings.
2. The Preview area — the area where are displayed the images. In the top-right corner of the Manage workspace there are two buttons (see the image); use these two buttons to switch between the two views — the Preview mode (a large single-image view) or the Thumbnail mode (a multi-thumbnail view - see the image below):
3. Info palette — displays information about the selected image (the settings used to take the photo, an area where you can add information about the image, such as tags and ratings).
4. The Organizer palette — this palette lets you select photos (as thumbnails) and includes a toolbar with a range of commands and options for managing photos.
If you don't like the Manage workspace aspect you can customize it: you can resize the palettes, you can undock and move them (see the image below), you can hide the Navigation palette and the Info palette

Click on the little arrow in the upper-right corner of the palette’s title bar. Check the Floating option. Drag the toolbar / palette to a new position. In order to dock a toolbar or palette, you can drag the toolbar or palette’s title bar to one edge of the workspace. The toolbar or palette snaps into place.

You can hide / show the toolbars and the palettes (except the Preview Area, which is always visible). The Show/Hide Navigation button (situated in the bottom-left corner) shows or hides the Navigation palette and the Show/Hide Info button (situated in the bottom-right corner) shows or hides the Info palette. You can hide / show the Palletes from menu -> View -> Palettes. Useful tip: Press "Ctrl + Shift + T" to display all toolbars and palettes.


