For more Chinese New Year greeting cards visit my website, www.seiza.ro.
Thursday, February 19, 2015
Happy Chinese New Year 2015! Gong Xi Fa Cai!
For more Chinese New Year greeting cards visit my website, www.seiza.ro.
Chinese New Year of the Goat / Sheep / Ram greeting ecards
Hello everyone, in this post I would like to present you our Chinese New Year ecards gallery. We have tried to cover as many client-wishes as possible, so in this gallery you can find both corporate ecards and e-cards for friends and family, animated ecards and static ecards, e-cards with messages written in traditional Chinese and simplified Chinese characters (and, occasionally, in english). All these e-cards are available for free on our website, www.seiza.ro


Saturday, February 14, 2015
Learn how to create a simple winter frame for your photos in Photoshop (2)
This post is a continuation of this one:
Now it's time to personalise the brush that will be applied on the path. First, select the Brush tool from the toolbox (or press the B key on your keyboard). With the Brush tool selected, open the Brush Preset picker and load the Assorted Brushes set (see the image below):

From the Assorted Brushes set choose the Crosshatch4 brush or the Crosshatch2 brush:

Depending on the size of your photo you might need to change the size (diameter) of the brush. For my photo (which is aprox 900x750 px) I've set the diameter of the brush to 50 px. The size of the selected brush is displayed in the Options bar (see the image below). If you need to increase / decrease the size of the brush you're using press the "] [" keys (the square brackets keys).

After you've set the size of the brush click the Toggle the Brush panel button located in the Options bar (or press the F5 key) to open the Brush Panel.
In the Brush Panel open the Shape Dynamics panel. Deactivate the Pen Pressure option and set the Roundness Jitler at about 30-40%

Open the Shape Dynamics panel. Change the scattering settings (Scatter, Count, Count Jitter) until your brush will look (approximately) like the one shown in the image below:

When you're satisfied with the result close the Brush Panel.
Read the 3rd part of this tutorial here:
Saturday, February 7, 2015
We are selling: Chinese New Year web banner sets
We are selling on shutterstock.com:
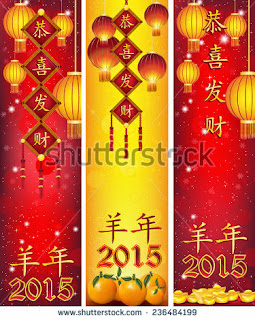
Chinese New Year web banner set. Color model: RGB. Format: high-resolution jpeg file. Dimensions: up to 5000 x 6000 px / 42.3 cm x 50.8 cm. Vertical text meaning: Happy New Year. Horizontal text meaning: Year of the Goat / Sheep. Contains specific elements: lantern papers, oriental gold nuggets.

Chinese New Year web banner set. Color model: RGB. Format: high-resolution jpeg file. Dimensions: 8192 x 4307 / 69.4 cm x 36.5 cm. Text meaning: Happy New Year; Year of the Goat / Sheep. Contains specific elements: lantern papers, oriental gold nuggets.
For more Chinese New Year web banners and ecards / printable cards visit our page on shutterstock: http://www.shutterstock.com/gallery-1888550p1.html
Learn how to create a simple winter frame for your photos in Photoshop (1)
Hi, everyone. In this tutorial I'll show you how to create a simple winter photo-frame for your photos.
Open your photo in Adobe Photoshop (I use Photoshop CS6, but earlier versions of Photoshop CS are fine as well).
Now, first step: you need some extra space around your photo, so you have to increase the Canvas size. Press CTRL ALT C (C from canvas) to open the Canvas Size dialog box. If you don't want to use shortcuts then go to Menu and choose Edit > Keyboard shortcuts > Application Menus > Canvas size. Don't modify anchor placement (by default, Photoshop centers the image and adds or removes the canvas around it, and that's exactly what we need for this tutorial).
In the Width and Height boxes you can see the width and the height of your photo, which, for the moment, are identical with the width and the height of your canvas. Increase both the width and the weight of your canvas with 50-100px, so you'll have enough space to play with the frame. Don't worry if it's too much space around your photo, we'll remove (some of) it later.
Using the Canvas Size dialog box you can also set a canvas colour. The following options are available: Foreground colour, Background colour, White, Black, Gray, or Other. If you select Other, Photoshop will open the Color Picker dialog box, where you can select any colour you need. In this tutorial we won't use this option, but it's better to know about it.

Step two: Create a new layer beneath the layer that contains your photo. The easiest way to do this is to open the Layer panel (press F7 if you don't see this panel on your workspace; if you still can't see the Layer panel that means the panel was opened but was collapsed, and that's way you wasn't able to see it; by pressing F7 you've just closed it. Press again F7 to open it again) and to click the New Layer button while holding the CTRL key down.
This combination (CTRL + New Layer) will create a new layer beneath the current layer. If you click the New Layer button without holding down the CTRL key, the new layer will be positioned above the current layer (the layer containing your photo). In this case you have to select the new layer and to move it beneath the layer that contains the photo. You can move it by pressing the CTRL and the left square bracket key ("[").

Fill the new layer with White colour: in the layer panel click on the new layer icon to select it, select the White colour as the Foreground colour, press the G key to activate the Paint Bucket Tool (or select it from the toolbar), and click anywhere inside the layer to fill it with the Foreground colour (White). Alternatively, you can select a layer and press Alt + the Backspace key to fill the layer whit the foreground colour (in our case, White colour).

Create a new layer and bring it on top of all other layers. From the toolbox select the Rectangle tool and select the Path drawing mode (see the image below). Draw a path around your photo; try to stay as close as possible to the photo's edges, but don't worry if the path does not match exactly to your photo. If you are addicted to precision, you can specify the dimensions of the shape to correspond with the width and weight of your photo and after that you can center the shape on the canvas to match exactly the photo's edges.

Open the Paths panel by choosing Window > Paths from the main menu. Double click on the path to give it a name and to save it:

Read the part two of this tutorial here:
Subscribe to:
Posts (Atom)