Showing posts with label corel draw basics. Show all posts

Saturday, February 6, 2016

CorelDRAW x5 basics: View Manager

Hi, everyone. In this post I'll present you one of the lesser known facilities available in CorelDRAW: the View Manager. As a beginner you might find this tool quite uninteresting, but when you get to work with large drawings you will recognize its importance.

Let's suppose you are working with a large, complex drawing and you have a small detail (or more small details) which doesn't fit with the rest of your artwork. If this is the case you have to zoom in in order to make small adjustments, to zoom out to see the whole image, to zoom in again to make more adjustments, to zoom out again, and so on until you are satisfied with the result. This Zoom in/Zoom Out process, which can be very annoying, can be significantly simplified if we use the View Manager tool.

In order to activate this tool, go to the main menu bar, choose Tools -> View Manager (shortkey: Ctrl + F2), as it shown in the image below:


In the image below you can see the View Manager docker. It contains seven buttons (Zoom one shot, Zoom in, Zoom out, Zoom to selected, Zoom to all objects, Add current view and Delete current view) and the list of the saved views.


Once you have saved a view of a part of your drawing, you can return to this specific view any time by clicking its name in the View Manager docker. If you need to use a specific view for a longer time you might need to rename it - to do so, you have to double click on its name in the list and type a new name. If you don't need a saved view any more, select it and click the Delete current view button in order to get rid of it. If you disable the Page icon next to a saved view on the docker, Corel switches to the magnification level only, not the page. Similarly, if you disable the Magnifying glass icon, Corel switches to the page only, not the magnification level.

Monday, April 13, 2015

CorelDRAW x5 basics: the viewing modes (7) - Pixels View

The Pixels view viewing mode allows you to see the pixel-based version of your drawing. By using this viewing mode it's easier for you to position the objects of your drawing more precisely; in addition, this viewing mode will help you to see how your drawing will look like when you'll save it into a bitmap format.

To activate this viewing mode go to View and choose Pixels. When the Pixels viewing mode is activated, the Snap to Pixels option will become active, too.


The Pixels view viewing mode is very useful especially when you are working with very large or very complex drawings; it is also useful when you are working with paths and you want to precisely adjust the curves. When the Pixels view viewing mode is active, if you choose a magnification level equal or greater with 800% the Pixel Grid will be automatically activated (sometimes you might find this option annoying, so I'll show you how you can disable and enable it when you need to). When you move the cursor around the grid various snap points (namely, pixel corner, pixel edge and pixel center) appear, allowing you to gain a batter control over your drawing.


If you want to customise the Pixel Grid go to Tools -> Option (shortkey: CTRL + J) and choose Document -> Grid. In the dialog box which is displayed you can choose how the Pixel Grid will be displayed (as lines or as dots) and how "dense" the grid should be. You can also activate and deactivate the following options: Snap to grid, Snap to pixel and Show pixel grid at 800% and higher zoom. CorelDraw offers you the possibility to change either the colour of the grid or/and the grid's opacity (use this option to avoid the inconvenient situation when your drawing and the grid have the same colour).

Tuesday, January 20, 2015

CorelDRAW x5 basics: the viewing modes (6) - the Wireframe and Simple Wireframe viewing modes (Part 2)

Why do we need the Wireframe view and Simple Wireframe view

Some people (usually beginners) tend to completely ignore the Wireframe viewing modes, but you should know that they are extremely useful and, as your artworks will become more complex, these viewing modes will become essential for you. The list below, without being exhaustive, provides several examples of situations in which you may need to use one of these two viewing modes.

- in Wireframe view modes it's very easy to precisely position every object of your drawing.

- sometimes you might need to check the basic form of an object; the easier way to see the basic forms of your objects is to preview your artwork in Wireframe view mode.

- use the Wireframe viewing modes to check if you drawing contains unnecessary copies of objects (this method is particularly useful when setting files for output to machinery such as plotter cutting, laser cutting or engraving).

- In Wireframe view mode it's easier to edit a complex path or to check your artwork to see if it contains open paths. Also you can see if the lines are smooth in their curve lines or require the addition of extra nodes, node control points or require adjusting.

- before printing your artwork you should check if two (or more) objects with the same fill and stroke colour are overlapping (in the Wireframe view mode they will appear as overlapping lines). You should pay a particular attention to your text - especially when you are using serif-fonts. If your letters are overlapping this will create problems for industrial machinery and large format digital printing equipment.

- when you can't find an object in your artwork (missing elements, which are usually hidden by other elements rather than actually missing, are a very common problem for the beginners) the easier way to find it is to commute to Wireframe viewing mode - as you can see in the images below:


Saturday, December 6, 2014

CorelDRAW x5 basics: the viewing modes (5) - the Wireframe and Simple Wireframe viewing modes (Part 1)

In the previous posts I've talked about the "Previous" Modes (Enhanced, Normal and Draft). Today I'll present you the Wireframe viewing modes (also called Outline view in other graphic programs). Wireframe and Simple Wireframe are those two unexciting (but very important) viewing modes that show plain black outlines and no colours. In the images below you can see the characteristics of the Wireframe viewing modes: the Simple wireframe viewing mode displays only the outlines of the objects by hiding fills, extrusions, contours, drop shadows, and intermediate blend shapes. The Wireframe viewing mode displays a drawing in simple wireframe mode plus intermediate blend shapes. In both these two viewing modes bitmaps are shown as monochrome grayed areas.


In wireframe viewing modes bitmaps are displayed in monochrome.


Blended objects displayed in Enhanced viewing mode.


Blended objects displayed in the "Simple Wireframe" viewing mode.


Blended objects (with intermediate blend shapes) displayed in the "Wireframe" viewing mode.


Objects with various fills displayed in the "Enhanced" viewing mode.


The same objects as in the image above displayed in the "Wireframe" viewing modes.


Wireframe and Simple Wireframe viewing modes only affect the screen display. Your document will still print or export in full colour, with all the effects you've applied.

Thursday, November 13, 2014

CorelDRAW x5 basics: the viewing modes (4) - the Draft viewing mode

Sometimes, when you are working with huge CorelDraw projects your computer might slow down significantly, even in the Normal viewing mode (which is, anyway, less demanding than the Enhanced mode). If this happens, you can switch to an even less demanding viewing mode - the Draft viewing mode. This viewing mode is also recommended when one wants to evaluate basic colour schemes in a vector drawing.


Characteristics of the Draft viewing mode:
- the anti-aliasing option isn't available in this viewing mode, so the oblique lines and the curved lines will look harsh and jaggy
- bitmaps are displayed on low resolution
- fountain-fills are not displayed correctly (for example, in CorelDraw x5 and in the later versions, if you have a two-colours fountain-fill/gradient-fill, instead of the gradient will be displayed only the colour that is located in the middle point of the gradient. In the previous versions of CorelDraw a checkerboard pattern is displayed instead of a gradient fill.)
- the Pattern Fill, Bitmap Fill, Texture Fill and PostScript Fill are not displayed correctly in this viewing mode (see the images below).


The circle in the foreground is filled with a two-colours gradient (from yellow to red), which is properly displayed in the "Enhanced" viewing-mode (see the image above). When the "Draft" viewing mode is used, the gradient fill is replaced with a single-colour fill - namely, orange, because orange is the intermediate colour between yellow and red.


If we compare the two imeges above we can easily observe that only the uniform-fill is properly displayed. A single colour replace the fountain-fill, a two-headed arrows pattern is displayed instead of the pattern-fill, bitmap-fills are replaced by a hatched-lines pattern, a black-and-white texture is displayed instead of any texture-fill and a pattern of repeated PS is displayed instead of the PostScript fills.

Saturday, November 8, 2014

CorelDRAW x5 basics: the viewing modes (3) - the Normal viewing mode

As I've said in the previous post, Enhanced is the best viewing mode and is the default setting in CorelDRAW. If you have an old computer or a computer with a weak video card, or if you have hundreds of objects and effects on a page, you might have to use a less demanding viewing mode, namely the Normal viewing mode. As you can see in the pictures below, there are not so many differences between these two viewing modes: the anti-aliasing option isn't available in the Normal viewing mode, the PostScript fills aren't displayed and the bitmap-fills are displayed in a lower resolution.


The Anti-aliasing option is not available in the Normal viewing mode, so the curves aren't smooth in this viewing mode.


The Enhanced viewing mode displays the best possible quality for your monitor; this viewing mode displays high-resolution bitmaps, PostScript fills and anti-aliased vector graphics.


The PostScript fills aren't displayed in the Normal viewing mode. You'll notice also that the colours of the bitmap fill are not as vivid as they should be.

Saturday, November 1, 2014

CorelDRAW basics: the viewing modes (2) - the Enhanced viewing mode

Enhanced is the best viewing mode and is the default setting in CorelDRAW (If you want to choose another default viewing mode click Tools Options -> click General in the Document list of categories and choose an option from the View mode list box.)

The Enhanced viewing mode displays the best possible quality for your monitor; this viewing mode displays high-resolution bitmaps, PostScript fills and anti-aliased vector graphics.

Aliasing is the process by which smooth curves and other lines (usually the diagonal lines) become jagged (jaggies are stairlike lines that appear where there should be smooth straight lines or curves) because the output device (display monitor or printer) does not have enough resolution to portray a smooth line. In addition, this process often occur when a bit-mapped image is converted to a different resolution. Anti-aliasing is a software technique that smooths out jagged lines by surrounding the jaggies with transparent pixels to simulate the appearance of fractionally-filled pixels.

Additionally, when the Enhanced mode is activated you can activate two more options: Simulate overprints and Rasterize complex effects. These options are useful (or better said, essential) when you want to use your artwork for commercial printing.

Simulate overprints - when you print your artwork, if two ore more objects are overlapping, only the top objects will be entirely visible (and printed), while the non-visible portions of the rest of the objects are automatically removed. If you want to print the non-visible portions of your artwork you can use the Overprint option. The Simulate overprints option allows you to see the resulting colour of areas where overlapping objects are set to overprint.

Rasterize complex effects Use this option when you want to see how these complex effects (bevels, transparencies, drop shadows, etc.) will be printed.

Saturday, September 27, 2014

CorelDRAW basics: the viewing modes (1)

When you are working in CorelDRAW you are using (for the most of the time) vector graphics. In order to display your artwork on the display, your computer needs to rasterize the vectors. Every time you make a change in your artwork, the computer needs to rasterize the artwork and to refresh the displayed image. Depending on the complexity of the artwork, on the type of effects you want to apply, but also depending on your computer's hardware configuration (video card, CPU performance and RAM) this process can be performed in a fraction of a second or in several tens of seconds, or even more (the annoying situations when when the display freezes). If these situations occurs frequently you might consider to change the default viewing mode (Enhanced) and use a less demanding viewing mode like Normal or even Draft (or, even better, to change your computer).

CorelDRAW allows you to display a drawing in various viewing modes (from low to high details): Simple wireframe, Wireframe, Draft, Normal, Enhanced and Pixels. Additionally, when the Enhanced mode is activated you can activate two more options: Simulate overprints and Rasterize complex effects.

The amount of time required to rasterize your artwork is not the only reason to switch between various view modes: sometimes you will need to use the Wireframe mode in order to locate a hidden object or you'll might need to check the overprinted colours before printing your artwork and in this case you have to choose the Simulate overprints viewing mode.

To choose a viewing mode open the View menu and click on the viewing mode you want to use (Enhanced is the default one). Press "Shift + F9" if you want to switch between the current viewing mode and the previous viewing mode (see the image below):


If you want to change the default viewing mode click Tools Options -> click General in the Document list of categories and choose an option from the View mode list box.

Monday, September 1, 2014

CorelDRAW basics: The Pan tool

Pan tool (also called "Hand" tool) is an additional way to view specific areas of a drawing. It is very useful when you work with large drawings and when you use a high magnification level and some parts of your drawing are not displayed in the drawing windows.

To use this tool you have to click on the Pan tool button (you'll find this button in the Toolbar in the same flyout with the Zoom tool). With the Pan/Hand tool activated click and drag your page until you'll see the desired area of your artwork in the Drawing Window. As you perform this action, the scroll bars and document rulers move in unison to reflect the new position.

Shortcuts available for this tool:
If you want to use the Pan/Hand tool while you are using another tool, you can activate the Pan/Hand tool by using the keyboard short-cut "H" (H from Hand). When you've finished with the Pan'Hand tool, click the Spacebar to return to the previous tool. This short-cut doesn't work when you are editing text.

Double-click the Zoom tool in the toolbox and the page will be centered in the drawing window.

With the Pan/Hand tool activated you can zoom in and out without alternate the two tools: double-click anywhere in the drawing window to zoom in, right-click in the drawing window to zoom out.

Friday, August 15, 2014

CorelDRAW basics: Zooming in CorelDRAW (6) - More customizations

When you are editing a quite complex drawing in Corel Draw it might be helpful to have the zoom buttons always visible. For this purpose you can activate the Zoom toolbar (I've written about this topic in a previous tutorial). Anyway, if you want to keep your work area organised and "clean" you might not want to open too many panels and toolboxes.

In this case, you might consider placing one or more of the zoom buttons in various toolbars (usually in the Property Bar, so these buttons will become visible every time the Pick tool is selected).

For this tutorial I've chosen the Zoom One-Shot button (this button is not included in the default user interface).

To make the Zoom One-Shot command appear as a button in a convenient place (let's say in the Property Bar) perform the following steps:
1. Click on the Pick tool to open the Property bar. Be sure nothing is selected in the Drawing window
2. Open the Options dialog box (CTRL+J or click Tools => Options) click Workspace => Customization => Commands.
3. From the drop-down menu choose View (see the image below)
4. Select the button you want to place on the Property Bar, drag it to the desired position and release the mouse button

Friday, July 25, 2014

CorelDRAW basics: Zooming in CorelDRAW (5) - How to change the default settings for the Zoom tool and Pan tool

If you use the mouse wheel, the wheel zooms in and zooms out by default. To zoom into a page, push the scroll wheel away from you; to zoom out you have to drag the mouse wheel toward you. If you don't want to use the mouse wheel for zooming, you can change the settings and use it for scrolling: click Tools => Options => in the list of categories, click Workspace => click Display; to specify the default action of the mouse wheel, choose Zoom or Scroll from the Default action for mouse wheel list box (see the image below).


When one of the Pan or Zoom tools is activated you can zoom out by clicking the right button of the mouse (this is the default action). However, if you want to use the right button of the mouse to display the contextual menu (as it is customary when any other tool is activated) you can change the default settings from the Options dialogue box (CTRL+J or click Tools => Options). In the list of categories click Workspace, double-click Toolbox, and click Zoom, Pan tool. To specify the action of the Zoom or Pan tool when you right-click in the drawing window, enable one of the following options:
Zoom out — zooms out by a factor of 2
Context menu — displays a menu of commands that let you zoom to a specific level

Friday, June 20, 2014

CorelDRAW basics: Zooming in CorelDRAW (4) - Customizing the Keyboard Shortcuts

As I've said in the previous tutorial, some of the Zoom tool commands in CorelDRAW have preassigned shortcut keys; if you don't want to use the default shortcut keys (for example, if you are accustomed with other graphic-design programs and you want to use some shortcut keys which are already familiar to you) you can easily change them.

Click Tools -> Options -> Customization -> Commands. Choose View from the drop-down menu at the top-left corner (see the image below).


A list of view items appears below it. In this list, click to select the tool or command you want to change (let's say the "Zoom to selected" tool). The aspect of the "General" tab in the right side of the dialogue box changes to display some basic information about the tool we've selected (Zoom to selected, in this particular situation) - see the image below:


Click on the "Appearance" tab if you want to modify the appearance of tool icons (personally, I don't think you'll ever really need it).


Click the "Shortcut Keys" tab. In the "Current Shortcut Keys" box you can see the Shortcut Key or the key combination that has already been assigned to the currently selected tool; you can select it and delete it. Click in the "New Shortcut Key" text entry box and press the key or the combination that you want to assign as the new shortcut. If you want to use the special keys ("Alt", “Shift” or “Ctrl”) you have to press them on your keyboard; don't type "Alt", "CTRL SHIFT", "Shift+F2", etc. in the text entry box. If the key combination is already assigned to another command, that command is listed in the Currently assigned to box (see the image below: the CTRL+D combination is assigned to the "Duplicate" command). If you click on the "Assign" button, your new assignment overwrites the old one. By enabling the "Navigate to conflict on assign" check box, you can automatically navigate to the command whose shortcut you reassigned and assign a new shortcut.

Monday, June 9, 2014

CorelDRAW basics: Zooming in CorelDRAW (3) - Keyboard Shortcuts

Follow on the links below to read the first two parts of this tutorial:
CorelDRAW basics: Zooming in CorelDRAW X5 (1)
CorelDRAW basics: Zooming in CorelDRAW X5 (2) - The Property-bar

Here is the list of the default zooming-shortcuts available in Corel Draw:
1. Z - this key activate the Zoom Tool. It doesn't work when you are editing text.
2. F2 - zoom one-shot. When you are using a tool and you need to get a closer look to your drawing but you don't want to change the tool you are using, you can use this shortcut. Press F2 and click once in the area you want to magnify; the zoom level will increase and the current tool will switch back to the previous tool you were using before switching to Zoom Tool. This can be very useful especially when you are editing paths.
3. F3 - Zoom out. By using this key your drawing will zoom out to the previous magnification level.
4. F4 - Zoom to all objects - adjust the magnification level to include all the objects (even if they are outside the drawing area). Alternatively, you can use this command by double-clicking the Zoom Tool button in the toolbox.
5. Shift+F4 - Zoom to page - use this shortcut when you need to see the entire page.
6. Shift+F2 - Zoom to selected - magnify only the selected objects. The shortcut can be used only if one or more objects are selected; if no object is selected and you press Shift+F2, nothing happens.

Sunday, June 1, 2014

CorelDRAW basics: Zooming in CorelDRAW X5 (2) - The Property-bar

Click on the link below to read the first parts of this tutorial:
CorelDRAW basics: Zooming in CorelDRAW X5 (1)

When you activate Zoom tool you'll notice that the content of the Property-Bar changes automatically in order to display the specific options of the Zoom tool (see the image below).
Corel Draw Zoom property bar
the default buttons displayed in the Property-Bar when the Zoom tool is activated


The list below contains a brief overview of the default buttons displayed in the Property-Bar when the Zoom tool is activated:
1. Zoom in - allows you to see more details of your drawing
2. Zoom out - allows you to view a larger area of the drawing
3. Zoom to selected - magnify only the selected objects (the Zoom to selected button is available only if one or more objects are selected before you click the Zoom tool; in the image above, because no object was selected, the Zoom to selected button is deactivated)
4. Zoom to all objects - adjust the magnification level to include all the objects (even if they are outside the drawing area)
5. Zoom to page - use this button when you need to see the entire page
6. Zoom to page width - adjust the magnification level to fit the entire page width
7. Zoom to page height - adjust the magnification level to fit the entire page heigth

Monday, May 26, 2014

CorelDRAW basics: Zooming in CorelDRAW X5 (1)

Hello! In this post I'll present you the Zoom function. As you work on an image, you may want to zoom out to see the whole image or to get closer to see details or make small adjustments. Corel DRaw offers you several options for zooming which will make your work a lot easier.

Go to Toolbox and select the Zoom Tool (if you are not editing text, you can access the Zoom tool by pressing the Z key). The mouse cursor changes to the magnifying glass with the plus sign and the Property-Bar displays the specific options of the Zoom tool (the default zooming buttons plus a drop-down list which allows you to choose between various degrees of magnification).

Zoom In - this is the default state while the Zoom tool is selected. With the Zoom tool selected, click in the area you want to look at; clicking once in the drawing window increases your view magnification by twice the current percentage of zoom, starting from the cursor's location on screen.

You can also zoom in by dragging the Zoom Tool around a specific area. Place your cursor at the corner of the area you want to magnify, and then click-drag diagonally to the opposing corner of an imaginary bounding box that defines the area to which you want to zoom.

If you want to view a larger area of the drawing, use the Zoom Out function. With the Zoom tool activated click the right mouse button anywhere in the drawing window or hold the SHIFT key and click on the left mouse button.

If you use a mouse wheel, the wheel zooms in and zooms out by default.

The zoom in / zoom out options are available when you use the Pan tool (double-click or drag anywhere in the drawing window to zoom in, right-click in the drawing window to zoom out).

You can set the magnification level from the Standard Toolbar (see the image below). You can select one of the Zoom-Levels from the list (the box showing the % of magnifications) or you can type the value you need. In this case the zoom levels increase and decrease beginning at the center of the drawing window.


If you want to have a quick access to the Zoom tools you can activate the Zoom toolbar: Window -> Toolbars -> Zoom (see the image below)

Thursday, March 6, 2014

CorelDRAW basics: undoing, redoing, and repeating actions (2) - The Undo docker

Sometimes (or better said, always) you might need more control over the Undo / Redo commands, so you'll need the Undo docker (Window -> Dockers -> Undo).


In this docker you can see all the operations which can be undone. The number of these actions depends on the number of the undo levels specified in the Undo settings (20 by default). If you reach the limit, which each new action performed the oldest item from the history list (the second element from the top of the list, because the first element - File New - cannot be undone) will be deleted and you won't be able to undo it.

If you want to undo a series of actions using the Undo docker, choose the action that precedes all the actions that you want to undo and click on it. As a result, all the actions listed below the action you've chosen will be undone; they will still appear in the list (usually on a darker background) and you can redo them (see the image below). If you modify your drawing in any way except by using the Undo / Redo commands, those actions will be deleted from the list and you won't be able to redo them.


If you want to redo a series of actions using the Undo docker choose the last action that you want to redo and click on it; all preceding undone actions will be redone.

Tuesday, March 4, 2014

CorelDRAW basics: undoing, redoing, and repeating actions (1)

The Undo / Redo /Repeat commands in Corel Draw
The Undo command (Edit -> Undo or shortcut-key: CTRL+Z) is a very useful feature which allows you to undo a number of recent actions starting with the most recent action.


If, for some reason, you don't like the result of an undoing an action (for example, when you use the undo command by mistake) you can redo it using the Redo command (Edit -> Redo or shortcut-key: CTRL + shift + Z). The Redo command is inactive until you use at least once the Undo command. If you undo one or more actions and then you modify your drawing in any way except by using the Undo / Redo commands, the Redo command will become inactive and it will no longer be possible to redo those actions.

Sometimes you might need to repeat the last action applied to an object. You can do this very easily by using the Repeat command (click Edit -> Repeat or use the shortcut-key: CTRL + R).

By default, CorelDRaw remembers only twenty previous actions which can be undone when one works with vector objects and only two actions which can be undone for the bitmap effects. If you want it, you can increase or decrease the number of actions that you can undo (and redo) by customizing the Undo settings (Tools -> Options -> Workspace -> General -> Undo Levels). The more you increase the number of undo levels, the more random access memory (RAM) is required to store the undo history, so don't increase the number of undo levels beyond a reasonable limit.


If you don't want to use the stortcut-keys you can use the Undo / Redo buttons from the Standard toolbar. Next to each one of these buttons there is a little arrow-shaped button. By clicking one of these two buttons and choosing an action from the list you can undo or redo a series of actions.


Revert to the last saved version of a drawing
If you are not happy with the result of your work and you don't want to waste your time with the Undo / Redo commands (or if some steps cannot be undone anymore) you can revert to the last saved version of your drawing. Click File -> Revert and the last saved version of your work will be restored (if you haven't saved your document yet the Revert command can't be used.

Thursday, July 25, 2013

CorelDRAW basics: restore the hidden toolbars

As I've said in a previous posts, there are several methods to access a hidden toolbar:
1st: go to Menu Bar, choose Window -> Toolbars and check the toolbars you want to display
2nd: right click on any toolbar or on the Tool Box; the list containing the names of the toolbars will be displayed and you can choose from this list the toolbars you want to display.
3rd: use the shortcut "Alt + o" to open the Tools menu (this method works only if the Menu Bar is displayed).

These three methods will work only if you keep at least one toolbar active. Anyway, if you are reading this post I assume that you were curious to see what's happen if you close all the toolbars and now you are surfing the web trying to find a solution to restore the them on the screen.

So, if you've just turned off all the application's toolbars you have two methods to restore them:
1. Use the CTRL + J shortcut to open the Options panel and check the toolbars you want to open (see the image below)


2. Right-click anywhere inside the Drawing window and, without moving the mouse, right-click again (a double-right-click). From the contextual menu choose the toolbars you want to display (see the image below):

Tuesday, June 25, 2013

CorelDRAW basics: dockers

A docker displays the same types of controls as a dialog box but it has the advantage that it will stay opened (unless you choose to close it), so it would be easy for you to access the commands you need. If you are familiarized with other graphic programs you've probably encountered this feature under the name of "Palettes".

To access a docker, click Window -> Dockers, and click a docker. As you can see in the image below, there are many dockers available and, if you choose to open too many of them, the dockers panel will become cluttered and it will be hard to manage the dockers. You can avoid this problem by closing all unused dockers. To close a docker, click the X button located in the upper right corner of the docker's window.


Dockers can be either docked in the edge of the application window or floating over the application window (see the image below). I prefer to keep all the dockers grouped in the docker panel, but sometimes it's preferable to undock some of the dockers and to drag them in the drawing window.

If you open more than two dockers in the docker panel they usually appear nested, with only one docker fully displayed. In the image above I have 4 dockers opened: the Object properties docker which is floating over the drawing area and another three dockers stoked in the docker panel: the Blend docker, which is fully displayed and two hidden dockers: the Extrude docker and the Bevel docker. You can display a hidden docker by clicking the docker’s tab.

If you need more space for the drawing window you can collapse both the floating dockers and the dockers panel. To collapse or expand the dockers panel click the arrow button at the top corner (see the image below).

Sunday, March 31, 2013

CorelDRAW basics: the Property bar

JW27EVPHTGYG
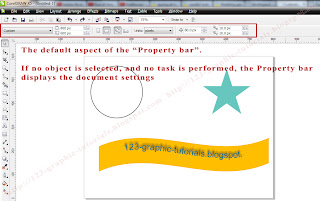
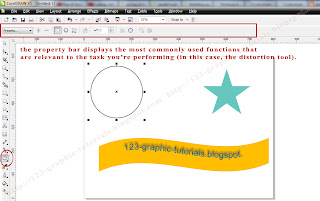
The Property bar is one of the most useful of the CorelDRAW's default toolbars; it contains the most commonly used functions that are relevant to the active tool or to the task you’re performing. The Property bar is not a toolbar; when you start the CorelDraw the Property bar displays informations regarding the current document; as you continue to work, the Property bar content changes depending on the active tool (or the performed task).


When no object is selected and no task is performed, the Property bar display the current document settings.


In the image above the Distortion tool is selected. The Property bar displays various distortion commands and options.


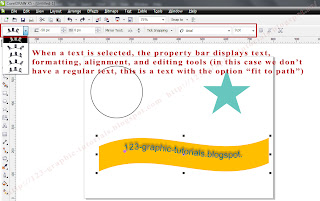
In the image above a text aligned to a path is selected. The Property bar displays various commands and options which can help you to edit the text or to set / edit the text alignment.


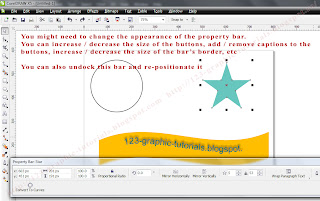
If you need it, you can customize the Property bar: you can dock / undock it, move it anywhere on the screen, modify it's appearance, and you can also set up a custom property bar by adding, removing, and rearranging toolbar items. If you want to change the bar's appearance go to the main menu, choose Tools -> Customization -> Command Bars and click on the Property bar. Now you can change the size of the buttons, the bar's border, the buttons appearance, etc.


In the image above the Property bar is floating in the lower side of the screen. Use the grab area to dock/undock/move the Property bar. Place it inside the application window if you need a floating property bar. Place it on any of the four sides of the application window if you want to dock it (to make it part of the window border).


If you (really) need to you can set up a custom property bar by adding, removing and rearranging the toolbar items. Go to main menu, choose Tools -> Customization -> and click on Commands. Choose an item from the commands list and drag it to the Property bar (see the image below, where the "Insert page before" is added to the Property bar). The new item will be included in the Property bar of the active tool or task (if you change the active tool, the new item will not be displayed in the Property bar; when the related tool will be activated, the new item will become visible again). If you want to remove an item from the property bar, drag the toolbar item icon off the property bar. Important: it is not a good idea to change the default items of the Property bar.


If you want to, you can add or remove items on / from the Property bar or you can customize a Property bar by rearranging the items.